Ambient Flash
Ambient Flash
Ambient Flash is a process that allows the coatings carrier solvents to completely evaporate and or “flash” prior to the cure schedule.
Cerakote is a solvent-based coating comprised of both liquid and dry materials. The liquid materials primarily consist of carrier solvents, which allow the coating to be sprayable in a liquid form.
Immediately after the coating has been applied, the carrier solvents will begin to slowly evaporate. Through this process of solvent evaporation, the coating will self-level and provide a smooth even finish.
NOTE: Prior to following the Elite and H-Series cure schedule, Cerakote recommends a minimum of 15 minutes and a maximum of 2 hours for the coating to ambiently flash.

Wet part (0 min ambient flash)

Flashed part/solvents evaporated (15 min. minimum – 120 min. max)
Application Guide: Pattern - M81 Camo
The Cerakote® M81 Camo
Our expert Trainers designed each individual pattern used in the vinyl stencils. Our easy-to-follow step-by-step instructions, as well as informative video, will walk you through the entire process. This pattern can be applied to firearms, knives, bicycles, cups, golf clubs, or anything you can Cerakote that your customer may want to show off on.
Resources
Technical Support Questions?
Application Guide: Pattern - Splinter Camo
The Cerakote® Splinter Camo
Our expert Trainers designed each individual pattern used in the vinyl stencils. Our easy-to-follow step-by-step instructions, as well as informative video, will walk you through the entire process. This pattern can be applied to firearms, knives, bicycles, cups, golf clubs, or anything you can Cerakote that your customer may want to show off on.
Resources
Technical Support Questions?
Atomization
Atomization
When utilizing a spray gun to apply a coating, proper atomization is required to transfer the coating onto a targeted object.
Proper atomization will result in a controlled spray, where the coating particles propelled from the spray gun nozzle will create a smooth uniform finish.
Adjustments to the air pressure will alter the particle size of the coating and provide different results in the wet finish.

Higher air pressures (15-30 PSI) will reduce particle size and will create a smooth wet finish.

Lower air pressure (5-15 PSI) will increase particle size and can create a textured wet finish.
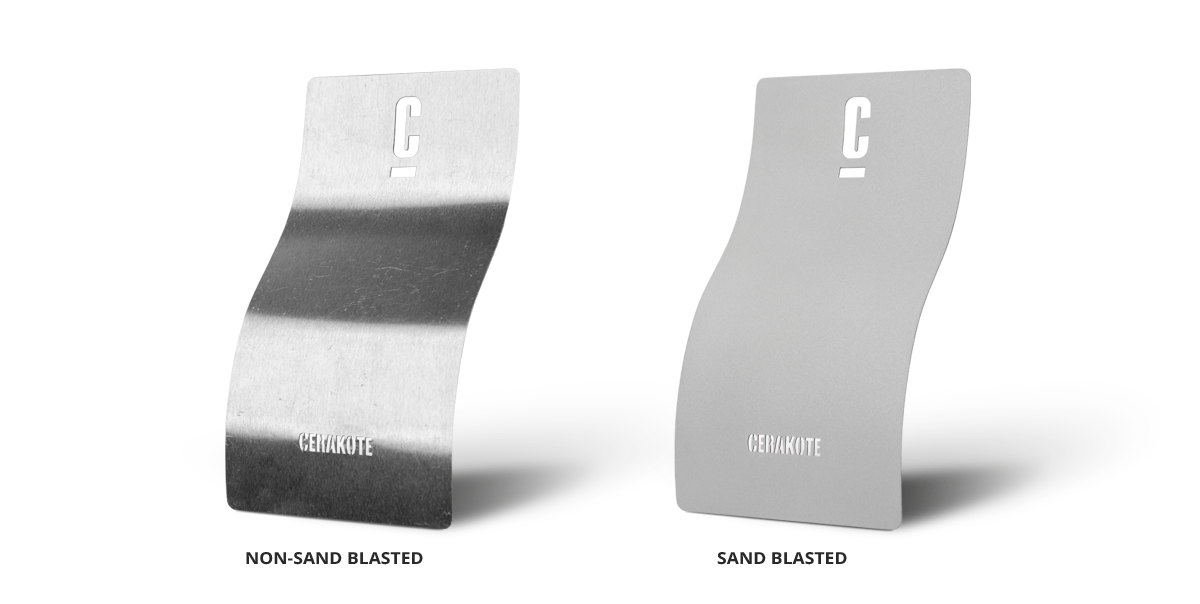
Can I Use Steel Shot or Glass Beads to Blast my Parts for Prep?
Recommended materials for sand blasting prep.
Having a proper mechanical profile is very important for the adhesion and durability of Cerakote.
For optimal performance we recommend using #100 grit Aluminum Oxide or Garnet Sand to give the surface a proper sand blasted profile. You can read more detailed information in our article "Cerakote Basics: Sand Blasting the Substrate".

Cerakote Laser Imaging

LASER IMAGING
Cerakote Laser Imaging is a process that produces varying color tones from a single color of Cerakote. This process does not etch, ablate or remove coating to reveal an additional color layer, or expose the substrate underneath. This effect makes it possible to create patterns on the Cerakoted part, leaving the protection of Cerakote intact.
The following guidelines describe how to create a test matrix on a fiber laser for Cerakote Laser Imaging. Each laser make, model, wattage, etc. will require different settings to create the desired imaging effect. This procedure is one way to get started with Laser Imaging on your own laser.
Every color of Cerakote reacts differently to the Imaging process. A recommended color list has been provided at the end of this page.
TEST METHOD
A 20-60 watt fiber laser is recommended for the Cerakote Laser Imaging process.
The preferred testing method that will be outlined in this guide is what will be referred to as the “Square Test”. The basis of the Square Test method is to create a power to frequency grid (Figure 1).
Cerakoted panels (3” x 6”) are recommended as a test medium. The test is laid out with varying frequencies and power levels. Each time the test is ran, a different pulse width, linespacing, or speed can be used. Changing these variables will allow the user to find the appropriate settings for their machine. Analyze the results and repeat until the desired outcome is achieved.
Generally, working with short pulse widths, high frequencies and faster speeds will yield better results.

Figure 1: Example power to frequency matrix. 500 to 800 kHz is a good range to start with.
CERAKOTE LASERING METHODS
Three different methods for lasering Cerakote are described below.
- Remove the Cerakote to reveal the substrate underneath.
- Remove a top layer of Cerakote to reveal the base layer of Cerakote underneath.
- Change a single color of the Cerakote to produce varying tones. This process is what is called Cerakote Laser Imaging.
CERAKOTE LASER COLORS
Note, not all colors are optimal for laser imaging. See below for a list of some recommended colors:
- E-120 SMOKE
- E-130 EARTH
- E-140 JUNGLE
- E-150 SAND
- E-170 M17 COYOTE TAN
- E-200 FDE
- E-210 MOSS
- E-290 STORM
- H-136 SNOW WHITE
- H-140 BRIGHT WHITE
- H-188 MAGPUL® STEALTH GREY
- H-189 NOVESKE BAZOOKA GREEN
- H-214 BULL SHARK GREY
- H-226 PATRIOT BROWN
- H-240 MIL SPEC O.D. GREEN
- H-268 TROY® COYOTE TAN
- H-293 VORTEX® BRONZE
- H-294 MIDNIGHT BRONZE
- H-297 STORMTROOPER WHITE
- H-298 PLUM BROWN
- H-314 CRUSHED ORCHID
- H-326 POLAR BLUE
- H-338 CHARCOAL GREEN
- H-343 MULTICAM® BRIGHT GREEN
Come conservare correttamente il Cerakote?
COME CONSERVARE CORRETTAMENTE IL CERAKOTE
Grazie per aver acquistato Cerakote. Esistono modi giusti e sbagliati per conservare le bottiglie di Cerakote e Catalyst. Per una durata di conservazione garantita di 12 mesi, seguire le raccomandazioni di conservazione riportate di seguito.
Ambiente di conservazione consigliato per Cerakote
- Temperatura ambiente (68°F - 74°F)
- Ambiente a bassa umidità (tra il 20% e il 50%)
- Luce artificiale o area buia
Unità di stoccaggio consigliate per Cerakote
- Armadi da negozio
- Cassette del ghiaccio vuote
- Scatole di cartone
- Frigorifero (non collegato)
Aree di stoccaggio da evitare
- Frigorifero funzionante
- Area con luce naturale (luce UV)
- Calore estremo (superiore a 80 °F)

Do I Really Need to Wear Gloves During the Cerakote Process?
When Do I Wear Latex or Nitrile Powder-Free Gloves?
- Contamination: when applying Cerakote products you always want to work off a clean substrate, wearing Latex or Nitrile gloves will ensure parts will not get contaminated through the process of application.
- Safety: it is recommended you always use proper PPE when working with Cerakote, Latex and Nitrile gloves will protect your hands from any coating and cleaning solvents.
You will need to wear powder free Latex or Nitrile gloves starting from Phase 2: Degreasing, through Phase 8: Curing Schedule.
Our hands carry oils and contaminants that will transfer to the surface of the parts you are going to be coating. If you handle parts with bare hands at any point between Degreasing and Flash Curing, you can leave finger prints, oils, or other surface defects on your finished product.
A common misconception is that you need to wear gloves when handling parts until the Cerakote is fully cured. This is not true! Once the Cerakote has become tack free from Flash Cure phase, you do not need to wear gloves while handling parts. Be cautious in handling parts not fully cured, the finish will be susceptible to scratching or marring. If layering colors, you may also want to degrease the surface before applying next layer of Cerakote using a wax and grease remover (do NOT use acetone to degrease Flash Cured Cerakote).

Examples of Photo Composition (Do's and Don'ts)
EXAMPLES OF PHOTO COMPOSITION
Photo quality is extremely important. Photos are a visual representation of your work and a very large part of what customers will base their decisions on when deciding upon whom to give work. We live in a world that is more visually inclined than ever before. Remember, you are projecting the quality of the coating and not necessarily the item itself when submitting it to our gallery.
The photo's below show proper composition and results using 2 foam posterboards and LED lighting.

DO:
- Find an area with proper lighting. This will give the consumer a better idea/vision of the quality of work you offer.
- Watch your backgrounds. A plain white background is the most ideal, but difficult to achieve without the proper lights set-up. If you don't have access to this, just make sure the background you decide to use doesn't take away the focus from your subject.
- Shoot multiple angles. The main shot you want is a close-up of the Cerakote job, zoom in on all the details. Don't sacrifice the focus of the Cerakote work, just because you want a photo of the whole project.

DON'T:
- DON'T OVERDO IT. Avoid any unnecessary props that take away from the coating job
- Avoid grass backgrounds or trees, especially if your project is a Camo Pattern
- Avoid workbenches with tools and trash in the background, Also avoid showing body parts.

Pro Tip:
- Focus-out or blur the background. This shifts all the focus to your subject and also adds a sense of a "Professional" shot. Use iPhone "Portrait" mode to get those buttery-smooth blurred backgrounds.
- There are thousands of basic editing apps you can use to take your photos to the next level.
- For optimal image quality upload images at 1500px X 1500px (Square Ratio) at 72dpi. Larger images may be compressed and/or degrade quality.
- Shop floors are highly used as backdrops for photos, everyone has one! This gives your gallery a consistent photo pattern, that makes your gallery an even look and flow.
- Remember, you don't need a "professional" camera to get the "perfect" shot. Nowadays most phones have the capability to take high-quality photos.
Flash Cure Elite & H-Series
Flash Cure Elite Series & H-Series
Flash Cure is a partial cure process accomplished by heating part(s) between 150°F-180°F (65°C - 82°C) for 10-30 minutes to allow the coating to become tack-free, but not fully cured.
Flash curing is a general practice to promote inter-coat adhesion when layering coatings for custom projects. This allows the parts to be handled while maintaining an adequate adhesion window for additional coating layers.
Tack-free time will vary depending on the substrate and substrate density. Under-cured parts will remain tacky and cause coating delamination from the substrate. Over-cured parts will prohibit additional coating layers from properly adhering to previous coating layers.
FLASH CURING FOR CUSTOMIZATION
| MATERIAL | TEMPERATURE | TIME |
|---|---|---|
| Metal, Plastic, Polymer, and Composites | 150°-180°F (65°- 82°C) | 10-30 Minutes |
Gas-Out
Gas-Out
Gas-Out is a preparation procedure that requires heating the parts to evaporate any remaining solvents from the degreasing phase, in the Cerakote preparation process.
This will also draw out any potentially trapped oils, air pockets, or contaminants in the substrate.


Removing all contaminants and trapped air from the substrate before applying and curing Cerakote, will ensure optimal adhesion and performance.
Gas-Out Tips:
- Signs of Gas-Out can show defects such as bubbles, pinholes, craters, fisheyes, and bumps.
- Certain parts may require multiple Gas Out attempts to completely remove entrapped oils or contaminants.
Recommended Gas-Out temperatures for substrate type
| MATERIAL | TEMPERATURE | TIME |
|---|---|---|
| Metal | 250°- 300°F (121°- 149°C) | 60 Minutes |
| Plastic | 150°- 180°F (65°- 82°C) | 60 Minutes |
| Composites | 150° (65°) | 60 Minutes |
See Phase 6 of the H and Elite Series Training Manual for additional information.
Gloss Guide - H Series Coatings
HOW DO I GET CONSISTENT GLOSS LEVELS, OR CHANGE THE GLOSS LEVEL?
Cerakote gives you the flexibility to customize your gloss levels across multiple substrates. This guide will assist you in achieving the gloss level that meets your requirements.
Standard Gloss Procedure
Catalyst Mixing Ratio: 18:1 (coatings:catalyst) by weight. Mixing by volume is optional.
Ambient Flash: Best practice is to set aside coated parts for a minimum of 15 minutes, but no more than 2 hours, before oven cure.
Recommended Cure Schedule
Coating a project with a single substrate (metal only, polymer or plastics only, etc.)
- Fully cure all parts according to cure schedule (see Figure A)
Coating a project with multiple substrates (metal and polymer or plastic pieces, etc.)
- Flash cure all parts at 150°F to 180°F until tack-free (10 to 25 minutes) to lock in gloss on all substrates (see Figure B and C)
- Separate all parts according to substrate cure schedule and complete final cure (see Figure A)
Note: Some Cerakote coatings require specific cure schedules.
- Always review the product specific Technical Data Sheet (TDS) prior to curing.
Why different cure temperatures? Many items, for example firearms, are built from multiple substrates such as polymers and metals. Substrates, like plastic/polymers, have lower temperature stability, and therefore require lower cure temperatures.
IMPORTANT: If you are unsure as to the temperature stability of your parts, contact the manufacturer prior to oven cure.
Gloss Guide / H-Series Coatings
figure A.

Catalyst Mixing Ratio
- Adjust your Catalyst mixing ratio to achieve your desired gloss level.

Cure Temperature
- Increasing or decreasing cure temperature will raise or lower gloss.

Note:
- Gloss units and levels are measured at a 60° angle, 18:1 catalyst ratio, 1-2 mil dry film thickness, 15 minutes ambient flash after application, 250°F cure for 2 hours. Adjustments to these conditions will yield different results. Gloss is affected by spray technique and quality of preparation and finish.
Guida alle applicazioni della serie H
APPLICAZIONE CERAKOTE SERIE H
Per una descrizione dettagliata del processo di applicazione, consultare il nostro MANUALE DI FORMAZIONE o il video di formazione.
Headlight Restoration FAQs
Q. Why does one of my headlights look better than the other after using the Cerakote Headlight Restoration Kit?
A. This is usually related to unintentionally being more thorough on one headlight. Unfortunately, this will require a Repair Kit (complimentary of Cerakote) for the removal of the existing finish using Step 2 Surface Prep Pads and a secondary application of Step 3 Ceramic Clear Coating. Ensure both headlights are evenly sanded, and one Step 3 Ceramic Clear Coating wipe is used per headlight.
If all steps have been thoroughly completed, it’s possible the internal surface of the headlight may be oxidized.
Q. Why do my headlights look bad after completing Step 2 in the Cerakote Headlight Restoration Kit?
A. Your headlights will appear scuffed and hazy after Step 2 due to the smooth etch you created from the 2000 grit and 3000 grit sanding discs. This smooth etch is crucial for our coating to adhere successfully to the surface.
Q. Can I touch-up missed areas on Step 3?
A. We do not recommend trying to touch-up areas, as this product quickly becomes chemically resistant once dry. This product is a one-coat application; more than one coat will have a cloudy appearance.
Q. What temperature can I apply Headlight Restoration?
A. Ideal environmental conditions for application will be in a shaded area with temperatures between 60°F and 75°F.
Q. Is there an expiration date for the Headlight Restoration Kit?
A. We encourage the use of the Headlight Restoration Kit within a year of purchase.
Q. What warranty does the Headlight Restoration Kit have?
A. We stand by our product and know it can perform when applied correctly. If an issue occurs that is not related to an application error, we are happy to send a replacement kit or provide a full refund.
How Much Cerakote Do I Need for My Project?
Calculating Coating Quantities
When planning to coat any project, it is essential to calculate the amount of coating needed before ordering so as not to underestimate and run out. When determining how much coating to buy, first locate the coatings' individual "theoretical coverage per gallon" from our Technical Data Sheets. It's important to understand that not every coating is the same in density and viscosity or recommended film thickness, meaning some coatings will cover more area than others. Using C-102 Graphite Black as an example, we can break down the coatings already calculated theoretical coverage of 677 ft²/gallon into ft²/oz. There is approximately 128oz in a gallon, therefore, we can divide the theoretical coverage of C-102 (677 ft²/gallon) by 128oz to get our coverage per ft²/oz.
677 ft² ÷ 128oz = 5.289 ft²/oz C-102 has a coverage of 5.3 ft²/oz
Once the coating coverage (ft²/oz) is known, roughly measure the square footage of your project and then divide that by the coating coverage (ft²/oz) to determine the coating needed.
Project 103 ft² ÷ 5.3 ft²/oz = 19.4 oz Cerakote C-102
If you have any questions, please feel free to email us at technicalsupport@cerakote.de
or call us at +49 (0) 4106-6414121.
How to Adjust Your HVLP Spray Gun?
HOW TO ADJUST THE IWATA lph-80 HVLP SPRAY GUN
Cerakote should be applied using an HVLP Spray Gun with a 0.8mm tip. NIC uses, and highly recommends the Iwata LPH-80 spray gun to apply Cerakote products.
Before coating your project, it is very important to dial-in your spray gun settings.This ensures you will be applying an even wet coat while avoiding runs or dry spray. Test the spray pattern by first spraying on a piece of paper taped to the wall.

Pro Tips for Applying Cerakote:
- Hang an easel pad next to booth filters to test gun settings.
- Keep the spray gun approximately 3-5 inches away from the part while achieving a 2-3 inch horizontal fan pattern.
- Use the chart below for suggested adjustments/settings on the Iwata LPH-80 spray gun.
- Pattern Adjustment Knob: 1 Turn (counterclockwise) from the closed position.
- Fluid Adjustment Knob: 2 Turns (counterclockwise) from the closed position.
- Air Adjustment Knob: Completely open (See Chart Above)
How to Flash Cure Cerakote?
HOW TO FLASH CURE CERAKOTE
Flash curing is the process of heating parts in a low temperature oven until they have become tack free, parts will be dry to the touch but not fully cured. This method is used when applying additional layers of Cerakote on top of the base coat. To promote optimal adhesion between layers, correct flash curing times and temperatures are very important.
We recommend the following flash cure schedules for H Series and C Series coatings to get proper adhesion and long-term durability.
H Series Flash Cure
- Oven flash parts for 10-25 minutes between 150°F - 180°F, just to the point of tack free (tack free time will vary, depending on substrate and substrate density).
C Series Flash Cure
- Air cure 45 minutes to 1 hour until tack free, (tack free times are varied depending on spraying environment i.e. Humidity & Temperature).
Elite Series
- We do not recommend layering Elite-Series because adhesion may be compromised due to its high chemical resistance.
Over curing the base coat, when applying multiple coats, may result in poor adhesion and flaking. Under curing can result in the base coating remaining soft or tacky. If applying stencils, the stencil may peel-up the base finish upon removal.
NOTE: Be sure to always check the Application Guide specific to the product you are using for best results.
For questions, you can reach us at technicalsupport@cerakote.de.
How to Layer Cerakote Colors?
LAYERING CERAKOTE
Layering is a process of stacking multiple Cerakote colors to create custom designs. Through the process of layering colors, inter-coat adhesion is essential for optimal coating performance. Inter-coat adhesion refers to the chemical bond from one layer to another. The layering process will consist of the following steps.
- Apply a base coat to your part(s) at the recommended film thickness for the color being used. Refer to the product Technical Data Sheet for coating specifications.

- Allow the parts to Ambiently Flash for no less than 15 minutes and no longer than two hours.

- In a preheated oven set to 150°-180°F(65° - 82°C), flash cure the part(s) until they become tack free (dry to the touch). Depending on the product used, substrate type, and part density, this should take anywhere from 10-30 minutes.

- Once your part(s) are tack-free, remove them from the oven and allow them to cool to room temperature.

- Apply your desired stencils, ensuring they are flat on the surface to prevent lifting.

- Apply a light coat of your next color over the top of the exposed areas and repeat the flash cure phase.

- For any additional layers, repeat steps 5 – 6. If no additional layers are needed, remove the stencils, and follow the cure schedule for the substrate type.

PRO TIP:
In some cases, it can be difficult to achieve inter-coat adhesion when using colors higher in gloss. A lack of adhesion can lead to a coating failure such as chipping, flaking, and peeling. To prevent this from happening, you will want to create a mechanical profile on the surface being coated to ensure optimal adhesion. To do this we recommend lightly sandblasting at a low PSI, also referred to as the Etch Blasting Method.
- Apply your desired stencils to the flash-cured base coat.

- Etch Blast the part(s) at 20-30 psi, using a 100-grit Aluminum Oxide or Garnet Sand. To avoid removing any of the base coat finish or lifting the vinyl stencils, maintain a 6-8-inch distance from the part while not remaining in one spot for too long. Strive for a uniform dull finish across the part(s).

- Blow off the parts with dry compressed air to ensure no particles remain on the surface before coating.

- Apply a light coat of your next color over the top of the etch-blasted surface and repeat the flash cure phase.

- For any additional layers using high gloss colors, repeat steps 1 – 4. If no additional layers are needed, remove the stencils, and follow the cure schedule for the substrate type.

For any questions on this process click the “ASK A QUESTION” link below or contact us at technicalsupport@cerakote.de
How to Make a Custom Color?
MAKING YOUR OWN CUSTOM COLORS
Do you want your own custom color(s), but don’t want to pay for a formulation fee? No problem, you can mix colors within the same Series. You can mix H Series with H Series to create your own custom color. This is also true with mixing C Series with other C Series colors, Elite with Elite, etc..
Note:
- DO NOT MIX DIFFERENT SERIES OF CERAKOTE TOGETHER! i.e. C-Series with H-Series.
How to Mix a New Color
- Properly agitate the bottles of Cerakote colors that you wish to custom mix (recommended 5-10 minutes).
- Pour the Cerakote colors into a glass graduated cylinder staying within the parameters of desired mixing ratio (staying within ratio parameters is only required for H-Series or E-Series two part system).

H-Series
- Be sure to add the correct amount of Catalyst for ratio being used.
- Agitate the custom mix for 30 seconds to 1 minute.
- Strain coating into the spray gun using appropriate strainer for coating being used (strainer size labeled on Cerakote bottle).
- If the color is not achieved with initial mixes, you will have to repeat the example listed above in increments of 18:1 while adjusting Color A. and Color B. amounts until desired color has been reached.
C-Series
- Agitate custom mix for 30 seconds to 1 minute.
- Strain coating into the spray gun using appropriate strainer for coating being used (strainer size labeled on Cerakote bottle).
Note:
- We strongly suggest you keep track of the mix ratios for the colors you create. This will enable you to replicate the color for future purposes. Be sure to check out our Mixology page for custom color mix "recipes". We'd love to add your new color to it as well. Send us your recipe with a good quality photo of it applied to your project, name it and we will consider adding it to our collection!
How to Prep A Chrome Plated Surface?
A PERFECT SURFACE FOR CERAKOTE
Sandblasting an existing finish down to bare substrate is an important and necessary step for most Cerakote applications. Some finishes, however, are more difficult to remove with blasting media to achieve an adequate surface profile. A quality hard chrome plating is one example of a finish not easily or quickly removed. Luckily, it isn’t necessary to remove hard chrome plating completely for Cerakote to mechanically adhere. A quality hard chrome finish is a perfect surface for Cerakote to be applied over the top of.

ETCH-BLASTING
Instead of spending valuable time sandblasting hard chrome plating completely off the substrate, etch-blasting a profile into the chromed surface is sufficient for mechanical adhesion. Etch-blasting is achieved by setting the blasting cabinet air pressure to 30-40 psi, operating pressure. While blasting, move quickly and evenly across the part “matting” the chrome finish. Repeat until the whole part has an even etched profile and no “shiny spots.”
If the original finish is not a true hard chrome, but a decorative chrome, the plating will flake off and must be removed completely. This same rule also applies to hard anodizing, making etch-blasting the most efficient course of action.
Cerakote is only as strong as the substrate it's applied to.
Applying Cerakote to a finish that is not well adhered to the base metal will result in the Cerakote coming off as the original finish does.
Inter-Coat Adhesion
Inter-Coat Adhesion
Inter-Coat Adhesion refers to the chemical bond from one coating layer to its subsequent layer of coating.For example, when layering colors to create a custom pattern, the first layer of Cerakote will be applied directly to the sandblasted substrate and bonded through mechanical adhesion.
Additional layers of Cerakote will be applied directly to the underlying layer of coating and bond through chemical adhesion.

Optimal coating performance relies on proper inter-coat adhesion. Lack of inter-coat adhesion can result in Inter-Coat Delamination.
Inter-coat adhesion failure variables:
- Over flash curing
- Layering over high gloss colors
- Surface contamination
L'importanza di agitare completamente il cerakote prima di applicarlo
È MOLTO IMPORTANTE UNA CORRETTA AGITAZIONE (SHAKING) PRIMA DELLA SPRUZZATURA
Le materie prime e i solventi di Cerakote si separano e si depositano nel tempo, pertanto è fondamentale assicurarsi che le materie prime e i solventi siano mescolati accuratamente. Se Cerakote non viene miscelato correttamente, si creerà un rapporto non uniforme tra questi componenti, che darà luogo a un rivestimento ricco di solventi e dall'aspetto lucido o trasparente. Senza agitazione, il rivestimento sarà ovviamente incoerente. Quando un flacone non è stato miscelato correttamente, il rivestimento diventerà più viscoso (più denso), con conseguente scarsa spruzzabilità, estetica e prestazioni.
Le materie prime e i solventi di Cerakote si separano e si depositano nel tempo; assicurarsi di agitare vigorosamente Cerakote se lo si fa a mano. Per una corretta agitazione, si consiglia di utilizzare un agitatore per vernici, vedere di seguito i tempi di miscelazione consigliati.


TEMPI DI AGITAZIONE CONSIGLIATI

I seguenti rivestimenti Cerakote sono più densi e devono essere agitati qualche minuto in più:
- Serie C
- Serie Glacier
- Tutti i rivestimenti speciali
Suggerimento: per facilitare la miscelazione, si possono gettare biglie sgrassate o dadi esagonali nella bottiglia di Cerakote per facilitare l'agitazione.
Oven Calibration – Why it’s important.
Whether you own an electric or gas oven, it’s imperative to ensure it’s calibrated. Attempting to cure coated parts with an oven that has not been properly calibrated can be detrimental to the curing process. Cerakote is cured based on part metal temperature, and if coated parts do not reach the required cure temperature, poor performance, or premature coating failure can occur.
Calibration Equipment
A thermometer is required for calibrating the unit temperature displayed on your oven. /p>
There are two primary thermometers used for calibrating ovens:
Digital thermometer
with a wire thermocouple probe

Internal oven thermometer
(No Alcohol or Mercury Thermometers)

Digital Thermometer with Wire Thermocouple probe
The digital thermometer and wire thermocouple probe should meet the following standards:
- Accurate to at least 0.1°F/C ±
- Thermally rated for operating/calibration temperatures.
Thermocouples are more accurate than standard thermometers but are generally more expensive. For consistent readings, it’s recommended that this type of device be regularly calibrated, preferably by the manufacturer.
Use a wire thermocouple probe that can be introduced into the oven through the door space. Don’t open the oven doors when calibrating to avoid disrupting the internal temperature. Calibrate the oven chamber as often as required by your regulatory compliance schedule or manufacturer recommendations.


Internal Oven Thermometer
The oven thermometer should meet the following standards:
- Thermally rated for operating/calibration temperatures.
When an Internal Oven Thermometer is being used as a reference, door openings are required to check readings – this will ultimately lead to a longer calibration process but still provide accurate results as a more cost-effective option.
Use an oven thermometer that reaches temperatures higher than what’s being calibrated. Allow enough time for the oven to stabilize (~1hr) before opening the oven door to check the internal thermometer. Calibrate the oven chamber as often as required by your regulatory compliance schedule or manufacturer recommendations.

Remember!
Consistent and accurate oven temperatures are crucial for Quality Control. Stable oven temperatures will provide consistency in coating durability, color, and gloss.
Without a stable oven temperature, you will inevitably run into quality control issues, so be sure to check your oven's temperatures regularly.
Please refer to your oven manufacturer for detailed information on specific calibration procedures.
Polimerizzazione corretta di Cerakote Serie Elite e Serie H
TEMPI E TEMPERATURE DI POLIMERIZZAZIONE DI CERAKOTE SERIE ELITE E SERIE H
Temperature di polimerizzazione consigliate
Cerakote può essere polimerizzato alla massima temperatura di polimerizzazione consigliata indicata nella TDS All in one, in base al colore e al substrato. La temperatura di polimerizzazione standardizzata per la Serie H viene effettuata a 250°F per 2 ore, dopo un tempo di appassimento ambientale di 15 minuti. La temperatura di polimerizzazione standardizzata per la serie E è di 300°F per 1 ora dopo un tempo di appassimento ambientale di 15 minuti. Per ulteriori informazioni sui tempi di polimerizzazione, consultare la Guida all'applicazione di Cerakote Elite e Serie H.
Programma di polimerizzazione per la Serie H e la Serie Elite
Suggerimenti per la stagionatura
- Verificare la presenza di punti caldi nel forno, utilizzando un termometro IR (infrarossi). Gli elementi riscaldanti possono creare punti caldi che possono causare il deterioramento dell'estetica del Cerakote.
- Non collocare le parti rivestite a contatto diretto con la fiamma o con elementi riscaldanti in rame.
- I forni a convezione sono ideali per una distribuzione uniforme del calore in tutto il forno.
Per ulteriori informazioni, è possibile consultare il nostro manuale di formazione
Pressure Pot Set-Up
The IWATA Pressure Pot kit comes with an LPH80 Spray Gun, a 2 Quart Capacity Pressure Pot, an Airflow Regulator, 4x Push-to-Connect Tube Fittings (2x 1/4” male, 1x 1/8” male swivel elbow, 1x 3/8” female swivel elbow), a 1/4” Female Coupling, and 30 feet of 6mm OD hose that can be custom cut as needed for the fluid hose and air hose.

TOOLS NEEDED FOR ASSEMBLY
- Adjustable Wrench
- Teflon Tape
- Tape
- Razor Blade
- 1/4" Female Quick Connect

PRESSURE POT ASSEMBLY
- Apply Teflon Tape on all joint threads to create an air-tight seal.

- Attach a 1/4” Male Quick Connector to the left side of the Air Regulator Joint located on the regulator body (1/4” NPT Quick Connector is not included in the kit).

- Assemble the Airflow Regulator by installing the Pressure Gauge into the 1/8” port located on the Airflow Regulator body.

- Install a 1/4” Male Push-to-Connect Tube Fitting onto the 1/4” Port located on the Airflow Regulator body. The direction arrow (bottom of the regulator) should be pointing in the direction of the airflow (toward your spray gun).
 Male push-to-connect fitting to 1/4" regulator port
 Airflow direction arrow at the bottom of the airflow regulator body
 - Install the 3/8” Female Push-to-Connect Tube Fitting onto the Fluid Joint located on the pressure pot handle.

- Install the assembled Airflow Regulator onto the right side of the Air Regulator Joint located on the regulator body.

AIR/FLUID HOSE PREPARATION
- Split the 30’ hose to make one 15’ Air Hose and one 15’ Fluid Hose.
 NOTE:
NOTE:
To avoid confusion when connecting the hose lines, it’s helpful to tape and label both ends of the Air Hose.
When labeling, leave at least one inch of space from each end of the hose to allow a proper connection.
- Insert the labeled Air Pressure Hose into the Push-to-Connect Tube Fitting that is attached to the Airflow Regulator. Make sure you feel the hose lock in place when inserting the hose into the tube fitting.

- Insert the unlabeled Fluid Hose into the Push-to-Connect Tube Fitting that is attached to the Fluid Joint located on the pressure pot handle. Make sure you feel the hose lock in place when inserting the hose into the tube fitting.

SPRAY GUN ASSEMBLY
- Install the 1/4” Female Coupling to the IWATA LPH80 Air Nipple. Use Teflon tape to create an air-tight seal.

- Install a 1/4” Male Push-to-Connect Tube Fitting onto the Coupling that has been installed to the IWATA LPH80 Air Nipple.

- Install the 1/8” Male Push-to-Connect Tube Fitting onto the IWATA LPH80 Fluid Nipple.

- Insert the labeled Air Hose into the Push-to-Connect Tube Fitting that is attached to the Coupling at the bottom of the spray gun. Make sure you feel the hose lock in place when inserting the hose into the tube fitting.

- Insert the unlabeled Fluid Hose into the Push-to-Connect Tube Fitting that is attached to the IWATA LPH80 Fluid Nipple. Make sure you feel the hose lock in place when inserting the hose into the tube fitting.

PRO TIP:
To prevent the hoses from getting intertwined, it’s recommended to use tape or Velcro straps to attach the hoses to each other and to the spray gun. Wrap Hose
 Wrap Hose to Spray Gun
LOAD/PRESSURIZE THE SYSTEM
- Start by following Cerakote’s Standard Operating Procedures for coating preparation and load the coating into the two-quart container. It is recommended to load no less than 8 oz of the coating when using the pressure pot system.
- Secure the pressure pot lid to the 2-quart container and create an air-tight seal.

- Turn the pot pressure knob counterclockwise until you have completely closed the diaphragm. You should no longer feel tension from the diaphragm spring when completely closed. Doing this will not allow the Pressure Pot to be pressurized when the main airline is connected.

- Close the Pressure Release Valve by turning clockwise till tightened.

- Connect your direct pressure line (typically at the wall) to the 1/4” Quick Connect located on the left side of the regulator body. The direct pressure should not exceed 49 PSI (3.4 bar).
 Connect Main Air Line
 Direct Air Pressure Set
 - Set your pot pressure by slowly turning the pot pressure knob clockwise till the pressure gauge reads between 5 and 10 PSI (0.34 - 0.69 bar). The coating viscosity will help determine pot pressure settings, e.g., higher viscosity coatings will require 10 PSI pot pressure, and lower viscosity coatings will require 5 PSI pot pressure.
 NOTE:
NOTE:
Once the pot pressure is set, you will notice the coating begin to feed through the fluid hose; this is completely normal.
SPRAY GUN SETTINGS
To create your desired spray setting, adjust your atomizing air pressure from the airflow regulator (located on the pressure pot), the Fan Pattern adjustment knob on the spray gun, and the Fluid adjustment knob on the spray gun. Use an easel pad to test the settings before spraying parts.


Baseline settings for achieving a 7” – 8” oval fan pattern.
- Pattern Adjustment Knob – 2 Turns Counterclockwise (from a closed position)
- Fluid Adjustment Knob – 1 Turn Counterclockwise (from a closed position
- Atomizing Air Pressure – 30 PSI (set at the pressure pot airflow regulator

- Pattern Adjustment Knob – 1 Turn Counterclockwise (from a closed position)
- Fluid Adjustment Knob – 1/3 Turn Counterclockwise (from a closed position)
- Atomizing Air Pressure – 30 PSI (set at the pressure pot airflow regulator)

You can also view the Pressure Pot Set-Up video at Videos.
For any questions or concerns, please contact us at +49 (0) 4106-6414121 or technicalsupport@cerakote.de.
Rapid Ceramic Glass Coat FAQs
Q. Can I apply multiple coats of Cerakote Rapid Ceramic Glass Coat?
A. Yes, you can reapply on a clean windshield as needed. However, the glass cleaner wipes are only to be used on the initial application of this product.
Q. Can I continue to use my vehicle’s washer fluid/wiper system after applying Rapid Ceramic Glass Coat?
A. Yes, use your washer fluid/wiper system as you usually would.
Q. How long does Rapid Ceramic Glass Coat last once applied to my windshield?
A. Rapid Ceramic Glass Coat will last for several months. However, the longevity of our product depends on the application, weather exposure, how often the vehicle is washed, and wear/tear of the vehicle.
Rapid Ceramic Glass Coat can be reapplied to a clean windshield when characteristics of the coating have noticeably diminished.
Q. What temperature can I apply Cerakote Rapid Ceramic Glass Coat?
A. Ideal environmental conditions for application will be in a shaded area with temperatures between 60°F and 75°F.
Q. Is there an expiration date for the Rapid Ceramic Glass Coat Kit?
A. We encourage the use of the Rapid Ceramic Glass Coat Kit within a year of purchase.
Q. What warranty does Rapid Ceramic Glass Coat have?
A. We stand by our product and know it can perform when applied correctly. If an issue occurs that is not related to an application error, we are happy to send a replacement kit or provide a full refund.
Rapid Ceramic Paint Sealant FAQs
Q. Can I use Cerakote Rapid Ceramic Paint Sealant on more than just paint?
A. Rapid Ceramic Paint Sealant is designed specifically for a painted surface; however, Rapid Ceramic Paint Sealant is a water-based ceramic coating and can be applied to many other surfaces and provide its hydrophobic properties while also enhancing the shine of the surface. This includes fiberglass, carbon fiber, gel coat, smooth plastics, etc.
Q. How do I remove streaks after applying Rapid Ceramic Paint Sealant?
A. Apply more Rapid Ceramic Paint Sealant and buff with the microfiber rag until the streaks are no longer visible.
Q. Can I apply Cerakote Rapid Ceramic Paint Sealant over paint that has been waxed?
A. You can apply this product over an existing wax, but we recommend applying directly to the paint to achieve optimal results and performance.
Q. Can I apply multiple coats of Rapid Ceramic Paint Sealant?
A. This product can be reapplied as needed. If you’d like more gloss and shine, you can apply more Rapid Ceramic and buff with the microfiber rag until you achieve your desired finish.
Q. How long does Rapid Ceramic Paint Sealant last once applied to my vehicle?
A. Rapid Ceramic Paint Sealant will last for several months. However, the longevity of our product depends on the application, weather exposure, how often the vehicle is washed, and or wear/tear of the vehicle.
Rapid Ceramic Paint Sealant can be reapplied when characteristics of the coating have noticeably diminished.
Q. What temperature can I apply Cerakote Rapid Ceramic Paint Sealant?
A. Ideal environmental conditions for application will be in a shaded area with temperatures between 60°F and 75°F.
Q. Is there an expiration date for the Rapid Ceramic Paint Sealant Kit?
A. We encourage the use of the Rapid Ceramic Paint Sealant Kit within a year of purchase.
Q. What warranty does Rapid Ceramic Paint Sealant have?
A. We stand by our product and know it can perform when applied correctly. If an issue occurs that is not related to an application error, we are happy to send a replacement kit or provide a full refund.
Rilascio della pressione accumulata nelle bottiglie in Cerakote
ATTENZIONE: IL CONTENUTO PUÒ ESSERE SOTTO PRESSIONE
Le bottiglie Cerakote potrebbero subire un aumento di pressione durante il trasporto. La pressione può aumentare a causa di variazioni di temperatura e di altitudine. È importante che l'eccesso di pressione nei flaconi Cerakote venga accuratamente sfiatato o rilasciato.
Quando si sfoga l'eccessiva pressione nei flaconi di Cerakote, iniziare con l'uso di DPI (Dispositivi di Protezione Individuale) adeguati. Aprire con cautela il tappo per rilasciare la pressione eccessiva; una volta rilasciata la pressione, assicurarsi sempre di riposizionare e chiudere bene il coperchio prima di riporlo.
Importante: Cerakote C Series (Air Cure) è suscettibile di accumulare pressione se esposto al calore ambientale o durante i caldi mesi estivi dell'anno. La C Series può accumulare pressione quando si trova nell'armadietto di stoccaggio o sullo scaffale, quindi è necessario controllare periodicamente l'accumulo di pressione e rilasciarla se necessario.

Per ulteriori informazioni, è possibile consultare il nostro Manuale di formazione:
Sabbiatura del substrato - L'importanza di un profilo inciso correttamente
La scelta del mezzo di sabbiatura corretto è importante
Adesione
L'uso del giusto mezzo di sabbiatura è essenziale per ottenere il profilo meccanico corretto affinché Cerakote aderisca correttamente. Una buona adesione meccanica è fondamentale per le prestazioni di Cerakote.
Mezzi
Raccomandiamo vivamente di utilizzare solo ossido di alluminio o sabbia di granato con grana #100, in modo da ottenere un profilo di sabbiatura adeguato per l'applicazione e le prestazioni di Cerakote.
Materiale del substrato
Metalli
Sabbiare a circa 80-100 PSI, il profilo di sabbiatura deve assomigliare a una finitura simile alla carta vetrata. Dopo la sabbiatura, ispezionare i pezzi per verificarne l'incoerenza. Se dopo la sabbiatura la superficie del pezzo varia in termini di lucentezza, la sabbiatura non è sufficiente. Continuare a sabbiare i pezzi fino a ottenere un profilo uniforme.
Compositi: (ad es. plastica/polimeri/fibra di carbonio)
Sabbiare a circa 30-40 PSI, cercando di ottenere un profilo leggermente inciso; il profilo della sabbiatura dovrebbe assomigliare a un aspetto opaco. Dopo la sabbiatura, ispezionare i pezzi per verificarne l'incoerenza. Se dopo la sabbiatura la superficie del pezzo varia in termini di lucentezza, la sabbiatura non è sufficiente. Continuare a sabbiare i pezzi fino a ottenere un profilo inciso uniforme.
Suggerimenti
- Programmare la sostituzione regolare dei supporti per mantenere un profilo meccanico corretto e coerente; i supporti si rompono nel tempo e raccolgono contaminanti a causa dell'uso prolungato, che possono compromettere l'adesione del Cerakote.
- La sabbiatura ad alta pressione crea un maggiore attrito e può causare difetti superficiali se utilizzata su materiali più morbidi.
Per ulteriori informazioni sull'applicazione
Sgrassaggio Cerakote e alternative allo sgrassaggio
La fase di sgrassatura è un passaggio cruciale nel processo di preparazione Cerakote. La prassi standard di Cerakote per lo sgrassaggio del metallo consiste nell'immergere i pezzi per 20-30 minuti in un agente sgrassante come l'acetone, il detergente per freni o il verde semplice.

Uno sgrassatore a base di solventi è in grado di permeare al meglio le aree con tolleranze ristrette e di rimuovere i contaminanti senza intrappolarli.
Per sgrassare i metalli si possono usare anche metodi alternativi, ma può essere necessario quando si lavora con plastica, polimeri, fibra di carbonio, fibra di vetro o qualsiasi altro materiale sensibile ai solventi di sgrassatura consigliati.
Metodi di sgrassaggio alternativi e vantaggi
Pulitori a ultrasuoni
I pulitori a ultrasuoni sono comunemente utilizzati per lo sgrassaggio di parti in cui la rimozione di detriti o contaminanti dal substrato è più difficile o in aree con tolleranze ristrette. La maggior parte dei pulitori a ultrasuoni è progettata per utilizzare un agente sgrassante a base d'acqua, come Simple green®. Se l'agente sgrassante preferito è un solvente, è possibile utilizzare anche altri detergenti a ultrasuoni specificamente progettati e a prova di esplosione, come ad esempio l'acetone o il detergente per parti di freni.


I pulitori a ultrasuoni utilizzano onde sonore ad alta frequenza (20kHz>) per creare le cosiddette bolle di cavitazione. Le bolle di cavitazione implodono sulla superficie del pezzo e nelle aree circostanti per rilasciare un'onda di pressione di vapore acqueo quando la bolla di cavitazione scoppia. In combinazione con il calore, quest'onda di pressione allenta i detriti dalle parti, garantendo un processo di sgrassaggio efficace ed efficiente.
Il funzionamento ottimale di un pulitore a ultrasuoni richiede la regolazione degli elementi elencati.
- TEMPERATURA DELL'ACQUA: temperature più elevate dell'acqua contribuiscono ad ammorbidire e sciogliere la maggior parte dei contaminanti per aiutare a rimuovere i detriti dalla superficie del pezzo. La maggior parte dei pulitori a ultrasuoni può essere regolata tra 90°F e 180°F (32°C - 82°C).
- SOLUZIONE DI PULIZIA: In un pulitore a ultrasuoni si possono utilizzare diverse soluzioni di pulizia, da quelle a base di solventi a quelle a base d'acqua. Si raccomanda sempre di fare riferimento alle indicazioni del produttore dell'apparecchiatura per la scelta della soluzione detergente adeguata.
- DILUIRE LA SOLUZIONE: quando si usa un agente sgrassante a base d'acqua, diluire la soluzione in diversi rapporti di miscelazione può aiutare il processo di pulizia. Ad esempio, con un rapporto 10:1, aggiungere 10 parti di acqua a 1 parte di soluzione detergente per ottenere una diluizione media. Consultare sempre le indicazioni del prodotto per i rapporti di miscelazione raccomandati.
- DURATA DEL CICLO DI PULIZIA: per le parti fortemente contaminate, un ciclo di pulizia più lungo fornirà il tempo necessario per rimuovere completamente i detriti. I cicli di pulizia vengono generalmente determinati in base al tipo di materiale da pulire e al grado di contaminazione.
- FREQUENZA DELLE ONDE SONORE: aumentando la frequenza delle onde sonore si crea un volume maggiore di bolle di cavitazione per accelerare il processo di rimozione dei detriti. Un aumento delle onde sonore può contribuire ad accelerare il processo di pulizia, ma può anche danneggiare il materiale da pulire. Consultare sempre le istruzioni dell'apparecchiatura per i cicli di pulizia consigliati.
Strofinamento con solvente
Quando si sgrassano materiali più delicati, come le plastiche e i compositi, si può usare un solvente di sgrassatura multisuperficie, come un detergente per cera e grasso, per pulire la superficie. Questo metodo può essere vantaggioso per i progetti una tantum con parti che hanno poca o nessuna contaminazione superficiale, riducendo i tempi del processo di preparazione e la possibilità di danneggiare le parti a causa dell'impregnazione con solventi di sgrassatura più aggressivi.
Questo metodo richiede di saturare leggermente un panno privo di lanugine con un solvente per la pulizia di più superfici e di strofinare il substrato fino a pulirlo. Fare attenzione a non saturare eccessivamente il substrato con il solvente di sgrassatura. Per evitare la sovrasaturazione, utilizzare il metodo wipe-on wet, wipe-off dry (utilizzare un panno saturo di solvente per pulire la superficie, seguito immediatamente da un altro panno asciutto per eliminare i solventi dalla superficie). Una volta completata e completamente asciutta, si può passare alla fase successiva delle Procedure operative standard (SOP) di Cerakote.

Strofinare su bagnato

Asciugare con un panno asciutto
Agenti sgrassanti alternativi e vantaggi
Verde semplice®
Quando si sgrassano materiali plastici o compositi, in genere non si utilizzano sgrassanti a base di solventi (acetone, detergente per freni) perché questi materiali possono essere danneggiati se impregnati. L'uso di un detergente a base d'acqua come Simple Green® evita di danneggiare le parti ed è più economico e sicuro per l'ambiente, pur garantendo risultati eccellenti nella rimozione di grasso e sporco tenace.
Quando si utilizza Simple Green® o qualsiasi altro sgrassatore a base d'acqua in sostituzione di uno a base di solventi, è necessario apportare modifiche alla SOP Cerakote.
SOP sgrassante Simple Green®
SGRASSARE
Fase 1: immergere le parti in Simple Green® per 20-30 minuti. Consultare le indicazioni del prodotto per i rapporti di soluzione raccomandati (acqua e Simple Green®).

Fase 2: sciacquare i residui dalle parti con acqua calda.

ASCIUGATURA/SPEGNIMENTO A GAS
Fase 1: collocare i pezzi in un forno a 150°F - 180°F (65°C - 82°C) per l'asciugatura e lo spegnimento a gas. Questa fase è doppia: di asciugatura e di spegnimento del gas.

Fase 2: impostare un timer per 30-60 minuti per consentire ai pezzi di asciugarsi completamente e di spegnersi con il gas.
Fase 3: Esaminare le parti per verificare la presenza di contaminanti e ripetere le fasi di sgrassatura e asciugatura/spegnimento con gas se vi sono indicazioni visive di residui di olio sulla superficie delle parti. Quando le parti sono prive di olio dopo il processo finale di eliminazione del gas, procedere alle fasi seguenti del Manuale di formazione Serie H e Cerakote Elite.
- FASE 3: Mascheratura
- FASE 4: Sabbiatura
- PHASE 5: Racking
- FASE 7: Preparazione del rivestimento
- FASE 8: Spruzzatura
- FASE 9: Programma di polimerizzazione
Rimuovi cera e grasso
Gli sgrassatori sono utilizzati come trattamento di preparazione di più superfici e sono un solvente meno aggressivo rispetto all'acetone o ai detergenti per freni. Gli sgrassatori sono ottimi per diversi materiali, ma sono consigliati per le plastiche e i materiali compositi che non possono sopportare solventi più aggressivi.
Quando si utilizza uno sgrassatore per preparare una superficie, è consigliabile utilizzare il metodo wipe-on wet, wipe-off dry (utilizzare un panno saturo di solvente per pulire la superficie, seguito immediatamente da un altro panno asciutto per eliminare i solventi dalla superficie). Una volta completata e completamente asciutta, si può passare alla fase successiva della SOP Cerakote.
Strofinare su bagnato
Asciugare con un panno asciutto
La sede centrale di Cerakote segue rigorosamente le procedure operative standard per fornire risultati coerenti e di qualità nelle applicazioni di rivestimento e nella durata. Tuttavia, siamo consapevoli che le SOP di Cerakote possono dover essere modificate per adattarsi a substrati/materiali diversi.
L'utilizzo dei metodi di sgrassaggio standard di Cerakote o di alternative ridurrà la probabilità di difetti di finitura nelle fasi successive del processo di preparazione e applicazione di Cerakote.
Per qualsiasi domanda o dubbio sui metodi standard o alternativi, contattateci al numero +49 (0) 4106-6414121 o all'indirizzo technicalsupport@cerakote.de.
Tack Free
ACHIEVING TACK FREE WITH H SERIES AND ELITE SERIES
(THERMAL CURE)
After applying a layer of Cerakote, parts are ambiently flashed and placed into a preheated oven set to 150°F-180°F. Tack-free time will be achieved within 10-30 minutes, depending on the color and density of the substrate; this process for reaching Tack Free is known as Flash Curing.
HOW TO CHECK FOR TACK FREE
Once parts are coated and placed into an oven for Flash Curing, set a timer for 10 minutes. Following the 10-minute Flash Cure, check the part for Tack Free by using your finger and lightly pressing the surface in an inconspicuous spot. If the part is still tacky and leaves an imprint, continue to check every 5 minutes until no imprint is left behind.


Once Tack-Free, remove the parts from the oven and allow them to cool before handling or adding additional coating layers.
ACHIEVING TACK FREE WITH C SERIES AND GLACIER SERIES
(AIR CURE)
After applying a layer of Cerakote, parts are ambiently flashed to the point of being Tack-Free. Tack-Free time will be achieved within 45 to 60 minutes, depending on the color and ambient temperatures.
HOW TO CHECK FOR TACK FREE
Once a final coat has been applied, set a timer for 45 minutes to allow parts to ambiently flash. Following the 45-minute ambient flash, check the part for Tack-Free by using your finger and lightly pressing the surface in an inconspicuous spot. If the part is still tacky and leaves an imprint, continue to check every 5 minutes until no imprint is left behind.


Once Tack-Free, the parts are ready for handling or adding additional coating layers.
WHEN IS ACHIEVING TACK FREE IMPORTANT?
CUSTOMIZATION
INTER-COAT ADHESION
When layering colors with custom projects, checking for Tack-Free in between coating layers is imperative for optimal Inter-coat adhesion. Allowing the coating to cure beyond Tack-Free can lead to poor inter-coat adhesion.
APPLYING VINYL STENCILS
During the color layering process, you will need to achieve tack-free when adding or removing vinyl stencils. If a part is not Tack-Free, this can lead to finish defects or coating delamination.
HANDLING
If a part is not tack-free before handling, you will leave imprints/defects behind that will be present once cured. Always ensure your part is tack-free before handling.
Trade Shows

Come visit us at one of our upcoming tradeshows, where Cerakote® and Prismatic Powders® bring you the ultimate in coating technology and color innovation. Whether you're looking to enhance the durability of your products with Cerakote's industry-leading thin film ceramic coatings or explore the limitless color possibilities with Prismatic Powders' vast selection of custom finishes, we have everything you need to make your next project stand out. Join us to discover cutting-edge solutions that combine performance with aesthetic excellence and see firsthand why manufacturers and consumers across the globe trust our products.
W2470
October 15 - 17, 2024
Orange County Convention Center, Orlando, FL
24591
November 5 - 8, 2024
Las Vegas Convention Center, Las Vegas, NV
70313
January 21 - 24, 2025
Caesars, Las Vegas, NV
West Hall W5501
February 25 - 27, 2025
Las Vegas, NV
TBD
February 27 - March 2, 2025
Nuremberg, Germany
Trim Coat Restoration FAQs
Q. How do I remove Cerakote Trim Coat from my vehicle’s trim?
A. The best removal method is to scrub off the Trim Coat with a white magic eraser dipped in non-acetone fingernail polish remover. Thoroughly scrub the trim in a circular motion until you bring the trim back to its original state, be sure to keep the magic eraser wet with the non-acetone nail polish remover during the removal process.
Q. Can I use Cerakote Trim Coat on interior trim parts?
A. We only recommend using this product to restore faded, untreated, unpainted, exterior trim. It’s not to be used on interior, new, or plastic window trim.
Q. How do I remove Trim Coat from my vehicle’s paint?
A. If the coating is still wet, immediately wipe it off with a dry towel. If the coating has dried, the best removal method is to use a light polishing compound. We recommend Griot’s Garage Correcting Cream, it’s a one-step product that requires light buffing to remove moderate paint defects. Follow the buffing instructions provided with any polishing compound used.
Q. Can I touch up missed areas from the initial Trim Coat application?
A. We do not recommend trying to touch-up areas, as this product quickly becomes chemically resistant once dry. This product is a one-coat application; more than one coat will have a cloudy appearance.
Q. What temperature can I apply Trim Coat Restoration?
A. Ideal environmental conditions for application will be in a shaded area with temperatures between 60°F and 75°F.
Q. Is there an expiration date for the Trim Coat Restoration Kit?
A. We encourage the use of the Trim Coat Restoration Kit within a year of purchase.
Q. What warranty does the Trim Coat Restoration Kit have?
A. We stand by our product and know it can perform when applied correctly. If an issue occurs that is not related to an application error, we are happy to send a replacement kit or provide a full refund.
What are the mixing ratios for Cerakote Elite Series?
ELITE SERIES MIXING RATIOS
Cerakote Elite Series Cerakote Elite Series products can be mixed anywhere between 12:1 and 24:1 mixing ratios, we recommend you use one of the following three ratios for the desired finish.

What Equipment Do I Need to Start Applying Cerakote?
RECOMMENDED EQUIPMENT
We always recommend using quality equipment to yield the best results when using Cerakote products. The equipment listed is what we recommend and use at Cerakote headquarters. For manufacturers applying Cerakote professionally, we strongly encourage investing in the recommended equipment, or something similar in grade and quality. Investing in quality equipment will ensure a satisfactory finish and performance while also increasing production efficiency and lowering costs through reduced maintenance, and down-time.
Here is a list of the professional equipment that we recommend to get you started in applying Cerakote:


Other parts/tools you will need:
- Degreasing Tank
- Degreasing and Cleaning Solvent
- Powder Free Latex Gloves
- IWATA LPH-80 Spray Gun Kit
- Air Hose
- IWATA Spray Gun Cleaning Kit
- Cerakote Hook Kit
- Cerakote Mil Thickness Gauge
- Sand Blasting Media (#100 grit aluminum oxide or garnet sand)
- PPE (personal protective equipment)
If you have further questions on equipment, feel free to email us at technicalsupport@cerakote.de or give us a call at +49 (0) 4106-6414121.
For proper Cerakote application, please refer to the Cerakote Training Manual or view the manual on YouTube.
What is Dry Spray and How Do I Prevent it?
DRY SPRAY - TECHNIQUES AND TIPS TO PREVENT IT
CAUTION: One of the most common application errors is dry spray. Dry spray has a rough, sandpaper like appearance and is typically caused from poor solvent transfer during application. Cerakote should always have a smooth slick finish after product has been fully cured. During the application process it is very important to "Wet Out" the coating to avoid any possible dry spray.
Contributing factors of Dry Spray
- Spraying too far away from the part = poor solvent transfer
- Moving across the part too quickly = poor solvent transfer
- PSI settings too high
- Insufficient volume of coating
- Environment (high humidity or extreme heat)
- Excessive over-spray
Prevention
- Proper spray gun settings
- Proper speed and distance during application
- Always strive for a "Wet Coat"
- Environment (Room temperature between 68°F – 74°F, with 20% to 50% humidity)
- Use proper lighting to see Cerakote "Wet Out"

What is mil Thickness and Why Does it Matter?
WHAT IS MIL THICKNESS? HOW DOES IT AFFECT CERAKOTE?
A "mil" is a unique unit of measurement used to determine coating thickness. Special instruments called Mil or Coating Thickness Gauges are used to measure mil thickness. How thick is one mil? An average credit card is 30 mils thick. One mil is 1/30th of the thickness of a credit card!
Note: A mil is 1/1000th of an inch. A mil is NOT equal to 1 mm.

The mil thickness of a coating not only affects the appearance of Cerakote coatings, it can also affect the performance and protective qualities. A coating with a mil thickness that is too thin may have less than 100% coverage leaving the substrate vulnerable to corrosion. A coating that is too thick can have lessened overall durability. It is important to always strive for the correct mil thickness when applying Cerakote.

We highly recommend using the Cerakote mil Thickness Gauge to check for proper coverage of parts sprayed. The gauge we offer works on ferrous metals such as cast iron, carbon, and stainless steel, as well as non-ferrous metals, like aluminum.
For more information on Mil thickness and how it applies to Cerakote, you can check out our video:
What is the Shelf Life of Cerakote?
Details for Cerakote Storage
At Cerakote, we stand behind our products. We warranty all Cerakote products for 12 months from the date of shipment. To ensure you receive the highest quality product, every lot number of Cerakote gets tested for consistency and goes through our Quality Control Lab for review of Color, Gloss, and Viscosity.
If you are having issues with Cerakote product and we determine it to be defective, we will replace the coating or fully refund the original price of purchase.
Pro Tips for Shelf Life
- Order coating only as needed (this will help with over stocking materials and minimize expired product).
- Periodically agitate bottles of Cerakote that have been shelved for long periods of time (this will aid in ease of agitation for future use).

What PSI Do I Set My Spray Gun to Apply Cerakote?
Cerakote Spray Gun Tips
It’s important to set your air pressure, or PSI, at the correct setting for the proper application of Cerakote. We recommend you use the following settings based on the series of coating you are spraying:

Pro Tips for Adjusting Air Pressure
- Metallics: Due to higher concentrations of metallic flake, these coatings may be more prone to dry spray. Slightly reducing PSI will aid in reducing this issue.
- Low Viscosity: Thinner coatings can be susceptible to transparency or runs. Slightly increasing air pressure will help atomize sprayed product to aid in avoiding runs and/or a transparent finish.
- High Viscosity: High viscosity coatings may also be prone to dry spray due to decrease in flow. Slightly increasing air pressure will increase the flow of the coating and will reduce the potential for dry spray.
Why Are There Bubbles or Cracking on my Air Cured Project?
DO NOT APPLY AIR CURE CERAKOTE TOO THICK
SOLVENT POP - Cause
Applying Cerakote too heavy may result in solvent pop or spraying in an environment with excessive humidity and heat can also contribute to blistering. Metallic colors are going to be more prone to this issue.
SOLVENT POP - Effect
Solvent Pop happens when the outermost layer of the coating hardens before all the solvents have gassed off or evaporated. This forces gasses through the top layer of the finish and creates solvent pop or a blistering like effect.
If you have solvent pop, you will usually notice it within about an hour after application. Solvent pop looks like little bubbles under the coating or blistering. To fix this, you will need to re-sandblast parts, taking off the existing finish completely using either Aluminum Oxide or Garnet Sand #100 grit. When part is ready to be re-finished be cautious to not apply the new coat too heavy. Refer to the Application Guide that is specific to the product you are using for best results.

FLAKING OR DELAMINATION - Cause
Flaking or delamination is usually caused from surface contamination, prior to application, i.e. oil, grease, dirt, or excessive moisture. This can also occur if Cerakote is applied too thick, pushed passed its thermal stability or a poorly sand blasted profile. Cerakote needs a proper mechanical profile and film thickness for optimal performance.
FLAKING OR DELAMINATION - Effect
Flaking or delamination is when the coating separates its self from the substrate. Flaking of Cerakote will usually happen when exposed to high temperatures or operating temperatures. To fix this, you will need to re-sandblast parts, taking off the existing finish completely using either Aluminum Oxide or Garnet Sand #100 grit. When part is ready to be re-finished be cautious to not apply the new coat too heavy. Refer to the Application Guide that is specific to the product you are using for best results.

We suggest applying Cerakote C-Series and Glacier Series at 30 PSI. Glacier Series should only need one wet coat to achieve the l mil thickness recommended. Certain C Series products may take 2 or 3 coats to achieve their recommended film thickness. Be sure to check the Application Guides for specific information.
Why Cleaning Your Mesh Strainers is Important?
KEEP YOUR MESH STRAINERS CLEAN
It is important to use the correct mesh strainer* when applying Cerakote, but keeping your strainers clean is just as important.
Thoroughly cleaning your equipment will aid in proper functionality as well as reduce cost from damaged items being replaced. Properly cleaned strainers will allow coating to flow with ease and make the process much more efficient.

WHAT IS THE BEST WAY TO CLEAN THEM?
To ensure you get the best results and longevity from your strainers, we recommend the following processes.
- After Straining Cerakote into your spray gun, you will want to have a waste bucket, acetone, and lint free towels ready for cleaning mesh strainer.
- Begin by flushing acetone through bottom side of strainer to wash out any trapped particles. Clean the opposite side of the strainer using the same method until clean.
- Using a lint free towel moistened with acetone, lightly wipe down all other surface areas of strainer until clean. Avoid wiping the mesh screen as this can be abrasive to lint free towels and trap fibers into the mesh, possibly causing clogging and poor strain ability)..
ALTERNATIVE CLEANING METHOD
You can also place the In-Cup Mesh Strainer in an ultrasonic cleaner. If doing so, you will want to place the strainer with the mesh facing up so the grate of the ultra-sonic cleaner does not wear through.
Strainer Sizes By Coating
- 325 mesh strainer for the Elite-Series and High Gloss Clears
- 150 mesh strainer for H-Series, C-Series, and Matte Clears
- 100 mesh strainer for Cerakote metallic's and Glacier Series
Why Do I Need to Degrease Before I Blast?
IS DEGREASING REALLY THAT IMPORTANT?
Yes, Preparation is everything and it's very important that your parts are thoroughly degreased before application. Oils and other contaminants get trapped in tight areas and are released via heat through the gas out phase or curing phase. Improper degreasing will compromise adhesion in those areas and cause delamination of coating. For optimal adhesion it is imperative that the substrate be free of any contaminates i.e. oils, dust, grease, media. Degreasing also helps preserve your sandblast media by removing the grease and oils on your parts prior to blasting. This reduces contamination when sandblasting future projects.
For more details on the proper way to prepare your project, you can view our Training Manual, or watch our Training Video:
Why Is My Coating Discoloring After the Cure Cycle?

Correct Cure Times
COLOR STABILITY
Some colors within Cerakote H-series have a “Color Stability (F°) Max Temperature” that is lower than the “Coating Stability (F°) Max Temperature”.
Color Stability means that at a certain temperature the pigments within the coating will be subject to color shift through the thermal curing process.
This effect can be more prevalent with lighter pigmented colors such as white, yellow, or orange.
Before you cure your next lighter pigmented H series color, look up the “Color Stability (F°) Max Temperature” in the H-series Tech Data Sheets (TDS), found on the Cerakote website, to determine the max curing temperatures.
Cerakote recommends curing all metal parts coated in H-Series with our standard curing cycle of 250°F for 2 hours to ensure proper performance in durability and aesthetics (discoloration of any coating will not occur at 250°F for 2 hours).

Incorrect Cure Times

